
Before we launched our Kickstarter campaign for Ion, we knew we wanted to build something cool for the Internet to play with. It's one thing to see mockups and perfectly lit shots of a product before you buy, but what if there was a way to test drive a physical product via the net? We've seen plenty of Internet connected toys and projects over the years, which inspired us to make Ion web controlled. Being makers ourselves, we love to pull the curtains back and show the world how we made something in hopes of inspiring others. That being said, let's take a look at how Try Ion was built.
Ionode
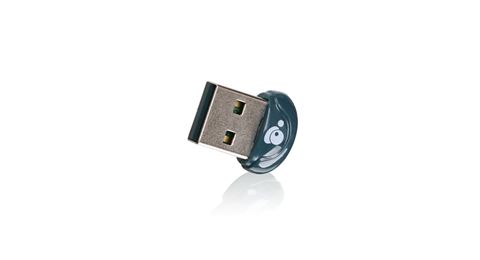
Before any web development could be done, I knew there needed to be an easy method for controlling Ion from a computer. Ion is equipped with Bluetooth Low Energy, a technology introduced with Bluetooth 4.0. Most smartphones and tablets shipping today have support for Bluetooth 4.0. Although I could have used a phone as our control device, I really wanted to control Ion from a device that most hackers have - a Raspberry Pi. Unfortunately the Raspberry Pi does not ship with Bluetooth, so I ordered some IOGEAR GBU521 adapters. At the time of writing, these modules cost ~$13 and are well supported under Linux.
At Lava, we use Node.js daily for the majority of our web projects. I've found it particularly useful for building realtime web apps, so it seemed a perfect fit for Try Ion. I searched for "node.js bluetooth low energy" in Google and quickly found the npm module called Noble. To my surprise, Noble worked out of the box with the IOGEAR modules. I now had a simple API for sending BLE commands via Node.js.
In order to simplify my own development and provide a library that any hacker could use, I began work on "Ionode", Ion's Node.js library. You can check out the code on Github and see some of the example code already there. Ionode is designed to be a lightweight wrapper around Noble that simplifies setting modes, triggering notifications, and changing Ion's configuration. We plan to continue supporting Ionode into the future and will gladly accept bug fixes/feature enhancements.
Hello, HTTP
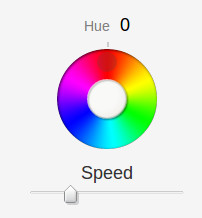
With the abstraction of Ion's API complete, I began building out the node.js skeleton project. I called this project "ion-control-frontend". Almost all node projects I work with include express, ejs, and socket.io. That was my starting point for Try Ion. As far as the front end is concerned, Bootstrap is still my go to framework for projects with tight deadlines. I also needed a few GUI controls for setting color and controlling each mode's settings. For this I included the YUI Library, which has a Dial and Slider widget.
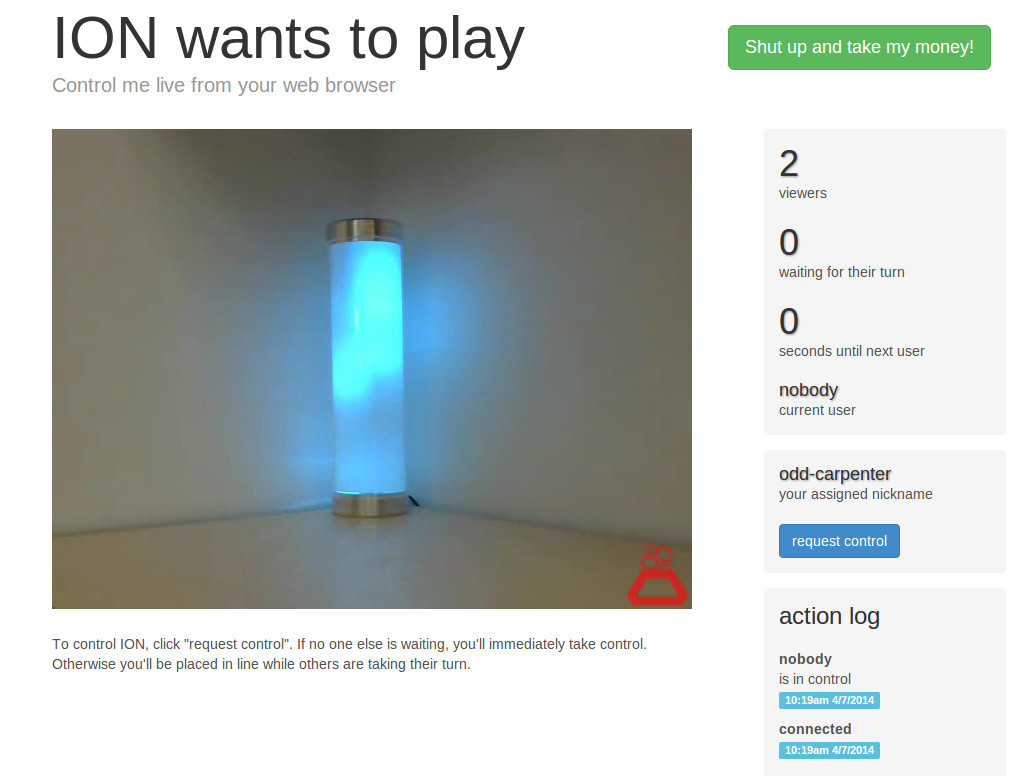
I've operated a few sites in that past that allowed users to control physical devices from the net. I've found that the experience can be confusing and frantic when more than a couple users are on the site at a time. For this reason I implemented a queuing system, allowing users to take turns while visiting Try Ion. In order to keep everyone's browsers in sync, I used socket.io to communicate events over a Websocket connection. When a user connects to the site, the node.js app generates a random nickname using the moniker npm module. Current queue details are sent frequently out over socket.io to all clients. When the node.js app grants control to a user, it generates a random key and sends it to that user. When the node.js app receives control events over socket.io, it verifies if the user's key matches the last key generated. If it does, those events are valid and will be sent to Ion.
Command Routing
Awesome, we have events coming in from users over socket.io. But how do we pass these events along to Ion? Try Ion's front end runs on a Virtual Private Server (VPS), so there needs to be a link between that server and a computer in our office connected to the lamp. At this point I started another node.js project named "ion-control-backend". This project's sole purpose is to receive events from ion-control-frontend and forward them to Ion using Ionode.
Having experience with message queuing and publish/subscribe systems in the past, Redis became one of my favorite tools for this job. I fired up a copy of Redis on the VPS and also locally on the computer in the office. I added a firewall entry to the VPS to allow incoming connections to Redis from our office's IP address. I did need to edit Redis' config file so that it bound to the VPS' public IP. I then edited the Redis config file for the local server and set the "slaveof" parameter to point to the VPS. With both servers restarted, I now had an established link between the two servers.
For the final infrastructure of Try Ion, I used this master/slave configuration of Redis servers. Initially I used just the node.js redis client to connect to the remote Redis server without the 2nd copy of Redis running. I had several issues with the connection dropping and failing to re-establish. With the master/slave Redis server configuration, I did not encounter any connection issues.
To finish the implementation, I added the "redis" npm module to both the backend and frontend. I configured the backend to subscribe to a Redis PubSub channel and the frontend to publish control events to that same channel.
Video Stream
Perhaps the most challenging piece of the puzzle, I needed to broadcast a video stream with latency in the 100-1000 millisecond range. Without a responsive video stream, Internet connected projects can be very frustrating at best.
At first I tried dropping in a Ustream embed and broadcasting through Ustream's web interface. Although incredibly easy to get up and running, I was seeing latency of 30-60 seconds. Unusable. I figured there had to be some live streaming solution with low enough latency. So I tried YouTube Live. Unusable. Livestream perhaps? Better, but still unusable. At this point I was losing faith in any pre-existing service. It seems that all of these services have optimized for concurrency first, and latency second. I began looking for other solutions.
I stumbled upon jsmpeg, an MPEG-1 decoder implemented in javascript that utilizes a simple websocket server to deliver frames. Skeptical, I fired up the demo. Even after relaying video through the VPS and playing back locally, my latency was sub 500 milliseconds. I was ecstatic! I quickly integrated the video streaming code into ion-control-frontend for receiving the stream, and modified ion-control-backend to fire up an instance of ffmpeg on start. Using ffmpeg, I could capture video from any cameras connected to the local server and stream over HTTP to the VPS. Once I tweaked the video settings, I had a decent looking video stream that averaged around 50KB/s. Here is the command I'm using in production:
ffmpeg -s 640x480 -f video4linux2 -i /dev/video0 -f mpeg1video -q:v 5 -r 24 http://serverip/streampassword/640/480/
By setting -q:v 5, ffmpeg works to keep a constant quality. This means the bandwidth used by ffmpeg may increase/decrease depending on the number of pixels changing in the frame. Ffmpeg can also be configured for a constant bitrate, but in our case I saw major video artifacting when any motion occured.
Although I wanted to send the MPEG data over socket.io, there is still no official support for binary data. I find this odd, as a vanilla Websocket can handle binary data on all modern browsers. I used the ws npm module in ion-control-frontend to start a vanilla Websocket server. This would allow me to transmit binary data direct to everyone's browser. Using an Nginx virtual host, I routed this websocket server to its own subdomain. From there I used reconnecting-websocket on the front end to connect the browser with the video websocket server. I did need to make a slight modification to reconnecting-websocket, as setting the binaryType was not supported at the time of writing this.
Holy $#%! Bandwidth!
With the live video stream up, I quickly realized we would be eating up a considerable amount of bandwidth. I needed to make sure that the stream would pause if a user switched to another tab, switched to a different window, or walked away from their computer. Using jQuery, I bound to the window's blur and focus events. This allowed me to disconnect the video websocket whenever the window was no longer active. I also added a 10 minute timeout which would be reset upon entering the queue or clicking into the window. These few optimizations should greatly decrease bandwidth usage and server bills.
Show Time
With everything set to go, I installed and configured an instance of haproxy in front of the node.js instance. This would allow me to monitor traffic easily (using haproxy stats), route port 80 to my internal node.js port, and reroute traffic to multiple servers if need be. One of the tricks of making haproxy work with websockets is ensuring your timeouts are greater than that of the socket.io heartbeat or however often you send data out over a vanilla websocket. For haproxy 1.4, this was as simple as adding the following two lines to my 'defaults' block:
timeout server 120s
timeout client 120s
If you haven't already checked out Try Ion, please do! Any feedback or comments are also greatly appreciated. It has been a blast watching users all over the world control Ion and I hope to see similar projects in the future.
Eric
EDIT: The sans video version of Try Ion has been open sourced here (for controlling your own ION over HTTP).